You’re gonna love how easy these modern Easter eggs are to make! You can create and decorate eggs to match ANY colour scheme or decorating style with the techniques I’m sharing today.


Both water marbling and geometric spray paint techniques create such beautiful eggs without a lot of effort (a bonus in my DIY world.) As you can see from the ones I made, I went with a softer colour palette with these pinks and blues but you can do whatever you like: bold, multicolor, black and white, neutral, metallic – the possibilities are only limited by your imagination !
Spring is almost here, are you ready to level up your egg decorating game? Let’s get started!
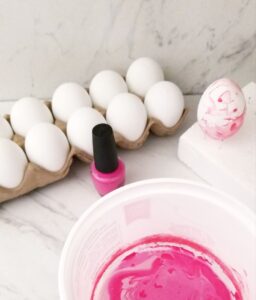
Modern Water Marbled Eggs
These modern marbled eggs are easy to do and maybe a bit messy but you can customize your eggs to any colour scheme. And you probably have all the items on hand to make these!

Here’s what you need
- White faux eggs (I used ones from dollar store)
- nail polish (whatever colour you like!)
- disposable container
- room temp water
- stir stick or straw
- Drying rack or carton (somewhere to dry the eggs, I used a piece of Styrofoam with pins to support the eggs while they dried.)

Directions:
- Fill the disposable container with room temp water
- Drop 4-5 drops of nail polish into the water.
- Swirl the nail polish with the stir stick.
- Dip egg and swirl in water
- Dry the eggs (place on your drying drying rack)
Modern Spray Painted
If you thought marbling eggs was an easy decorating trick, this is even easier.! Using stickers and tape to create geometric lines gave these eggs a modern design. (I bet black and white would look so cool with this technique too….hmmmm I may have to try that!)

Here’s what you need:
- White faux eggs (again, mine are ones from the dollar store)
- spray paint (whatever colour you like, I used Krylon ColorMaster in Aqua Matte )
- Craft tape and dot stickers
- Newspaper
Directions:
- Place tape or dot stickers around your unpainted egg. Be sure to press edges to egg tightly to create clean lines.
- Lay down newspaper and in well ventilated area, spray paint light coat on one side the egg (careful, because they’re lightweight plastic they roll around a bit)
- Once dry, roll over and paint on other sides (you may need to repeat this step a few times so that you can coat the entire egg evenly.)
- Once dry, remove the tape (or stickers)
Joyful Hostess tip: if spray paint bleeds under tape, take white paint and touch up those spots. For more tips on spray painting here’s all my best secrets for spray painting like a pro!
And for more egg inspiration, check out my egg decorating pins on Pinterest board “Egg Decorating” – so many cool options!


